It seems unlikely, but with a little effort Kodi is almost a full-fledged alternative to your television subscription. You can effortlessly receive the channels of the public broadcasters and various pay channels via all kinds of smart add-ons. This can be done via a connected TV tuner as well as via web streams. For example, you can watch live television with Kodi.
 These are the most used passwords of 2020 December 26, 2020 09:12
  The most popular Google keywords in the Netherlands in 2020 December 25, 2020 15:12
  Block emails in Gmail, Outlook and iOS December 25, 2020 12:12 PM
 These are the most used passwords of 2020 December 26, 2020 09:12
  The most popular Google keywords in the Netherlands in 2020 December 25, 2020 15:12
  Block emails in Gmail, Outlook and iOS December 25, 2020 12:12 PM
 1. Install Kodi
First, you will download and install Kodi. On this webpage you will find download links for most operating systems. There are versions available for Windows, Linux, MacOS, Android and even Raspberry Pi. Version 17 of Kodi just came out a few days ago. In this workshop we still use Kodi 16.1, but the differences are not very big. Choose the desired version and run the installation. Through Next you accept the license terms. Choose behind Select the type of install in front of Full. You round through Next / Next / Install finally finish the installation wizard. Also read: How to stream movies and series with Kodi.

OpenELEC
Do you only use a computer as a disguised media player? In that case, using OpenELEC is ideal. This is a humble Linux distribution that gives you access to Kodi exclusively. As soon as you turn on the system, the user interface of this popular media program is immediately ready for you. OpenELEC has low system requirements, so you can also use it on older systems. By the way, there are also ready-made media players with OpenELEC, such as the Eminent EM7580.
2 Dutch language
Kodi always boots up in the English language by default. Fortunately, there is also a Dutch translation available. Since the remaining steps in this workshop are based on the Dutch institutions, change the language first. For operation, use the mouse, keyboard or a suitable remote control. Go to SYSTEM / Settings / Appearance / International and choose back Language in front of English. You should see that Kodi immediately implements this change.

3 TV tuner
After you change the language, you can go through the other settings. This is how you choose skin for example, a different theme, so that Kodi gets a different touch. Return to the settings menu via the arrow at the bottom right. Does your system have a TV tuner, such as a DVB-T receiver? You can then pick up channels directly, although you will have to adjust some settings. Navigate to TV / General and mark the option Activated. Kodi checks whether pvr services (pvr stands for 'personal video recorder') are activated. That is not yet the case. click on OK to close the window. A list appears with about twenty PVR services that you can use. We will come back to this in step 7.

4 NextPVR
You need suitable software to receive live television from your TV tuner. Kodi cannot do this independently. Instead, Kodi uses add-ons that transfer the television channels from a suitable PVR program to its own interface. So your first concern is to pick up the channels with suitable pvr software. A program that can do this perfectly is NextPVR. In the installation wizard, click Next, after which you accept the license terms. Finally click on install and wait for the installation to complete.
5 Audio and Video Codecs
For the correct functioning of NextPVR, first dive into the settings. Start the pvr program and open the configuration menu. If the settings do not appear automatically, first right-click on the NextPVR icon in the system tray. Then choose Show settings. You go to the section first decoders. Here you indicate through which audio and video codecs you want to watch the broadcasts. In case of a dvb-t tuner, MainConcept (Broadcast) AVC/H.264 Video Decoder works fine. If you have no idea which decoders work for you, try it with the default settings first. You can always switch later.

6 Channel Scan
With NextPVR you now first map all available television channels from the TV tuner. Within the settings menu, go to Devices and select your system's TV tuner. Through DeviceSetup open the device settings. Bee Country select you Netherlands, so that NextPVR scans for the correct frequencies when scanning television channels. Then click scan to start the search. In the case of a DVB-T tuner, all well-known Dutch television and radio channels appear on the screen. The term Encrypted is mentioned on many channels. For these channels you need a suitable smart card from Digitenne. There are also some free channels, namely NPO 1/2/3 and a regional channel. Close all settings windows with OK.
7 NextPVR add-on
You are now using Kodi to watch the television channels. To do this, you need to activate the NextPVR add-on. Go to SYSTEM / Settings / Add-ons / My Add-ons / PVR Clients / NextPVR PVR Client and choose Configure. It is now necessary to establish a link between the programs NextPVR and Kodi. At NextPVR Hostname fill you 127.0.0.1 in. Confirm with Finished. Make sure that the port number 8866 is entered at NextPVR Port. The NextPVR PIN will let you on 0000 to stand. click on OK and then on Switch. Finally, restart Kodi.

8 Watching TV
You can now easily watch television via the TV tuner of your system. To do this, navigate to TV and Channels. A list with all available channels appears. Click on a channel to start playback. Clicking on the video frame opens an enlarged view. You also use Kodi to request a television guide and to record recordings. In addition, the TV tuner is also suitable for receiving radio stations. To do this, browse in the menu to Radio and Channels.
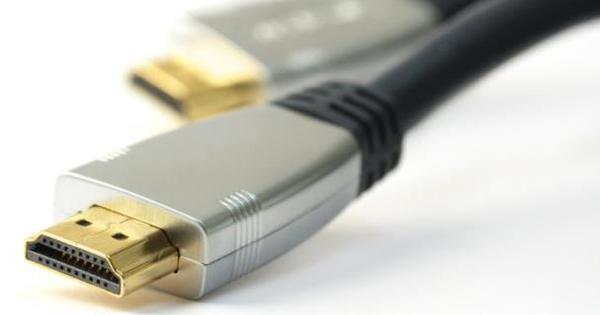
Connect PC to TV
If you decide to receive television channels on a PC, it pays to connect the system to a television. This way you can watch television on a larger screen. You can easily arrange this, because by far most PCs and laptops have an HDMI output on board. This allows you to use the television as an external screen. If you want to play sound on an audio system with connected speakers, connect the HDMI cable to the corresponding input on the receiver. Some receivers do not have an HDMI input. In that case, use an optical or coaxial s/pdif connection to transport sound to the audio system. In Kodi choose via SYSTEM / Settings / System / Sound Out the correct sound source.

9 Install add-ons
For Kodi we distinguish between two different types of add-ons. First of all, there are the extensions that Kodi itself offers. You can easily install it, giving you access to various television channels. Furthermore, Kodi is also open to add-ons developed by third parties. You can find plenty of those on the internet. We will discuss this in detail later in this workshop. We will first show you how to install add-ons from Kodi. From the main menu go to VIDEOS / Add-ons / Get more and read the overview. Have you found an interesting television channel? Click on it and choose to install. Through VIDEOS and Video add-U.S you have access to all installed television channels.

10 Netherlands 24
You don't have to put in much effort for live television from the public broadcaster. The Netherlands 24 add-on is available by default from Kodi. In addition to the three NPO channels, there are also various theme channels available, such as NPO 101, Politics and Cultura. You can also watch the last eight o'clock news. Simply click on a channel you want to watch and the web stream will open directly in Kodi. Use the control buttons at the bottom to, for example, pause or adjust the volume.
Missed services
It is interesting to know that you can add the Dutch missed services of RTL and NPO. So you can also easily watch programs from Kodi. From the main menu go to VIDEOS / Add-ons / Get more. Click on the extensions RTLxl and Missed broadcast (NPO) on to install. After the installation, you will find these add-ons among the other extensions. All available television programs are listed in alphabetical order. Click on a program title and open the desired episode.

11 Package Sources
Not all add-ons are available directly from Kodi. Numerous interesting extensions are circulating on the internet. You simply add them via a so-called package source (repository). Adding a repository to Kodi gives you access to multiple extensions in one fell swoop. That's handy, because it prevents you from having to add different add-ons manually. Moreover, you can easily try out various extensions. Are you curious about which package sources are available? Then take a look here.
12 Install Package Source
If you have a zip file from a repository, add it to Kodi. That way you can see which child add-ons are available for installation. Go to SYSTEM / Settings / Add-ons and scroll back to the home screen of this section if necessary. Choose the option Install add-ons using zip file. Locate the saved zip file and confirm with OK. You then click on Install from repository, after which you choose the title of the newly installed repository. See which add-ons are available and click Install. In the example of the Retrospect package source, you add all kinds of Dutch, Belgian and British television channels to Kodi.

13 Using Retrospect
Of course you are curious about which television channels are available via the Retrospect package source. click on VIDEOS / Add-ons / Retrospect. A warning may now appear that certain channels are only available via a Dutch internet connection. The television channels are divided into different categories, such as Kids, National, Regional, Sports and Radio. Make a choice here and click on the desired channel. Please note that Retrospect has integrated several missed services. Furthermore, live streams do not always work as well, so it is always a matter of trying it out.
14 SuperRepo
Another popular repository is SuperRepo. This contains all kinds of add-ons from various television channels, including even pay channels from sports channels. Although many web streams are unstable, you can always give it a try. If you'd like to learn more about what this repository has to offer, take a look at www.superrepo.org. Through Addons / Languages / Dutch take a look at the Dutch-language offer. Unlike Retrospect's previously discussed repository, there is no need to download a zip file beforehand. Instead, you get the repository by passing a web address to Kodi.

illegal
Keep in mind that there are a lot of pirated Kodi add-ons out there. Many users try to 'tap' streams from payment channels through various extensions, such as Ziggo Sport and Fox Sports. That is illegal, so use such extensions at your own risk.
Installing SuperRepo
You are now going to install the SuperRepo repository. Go to SYSTEM and File manager. With a double click on Add location a new window will appear. You type in the input field //srp.nu, after which you confirm with Finished. Now give this location a name. It makes sense to fill in SuperRepo here, so that you can easily find the repository later. click on OK. You will now import the contents of the SuperRepo repository. Return to the main menu and scroll to SYSTEM / Settings / Add-ons / Install add-ons using zip file. Click in the list on SuperRepo. When using Kodi version 16.1, go to Jarvis / repositories / super repo. Click on the zip file to complete the installation. If you are using version 17 of Kodi, click krypton.

16 Explore SuperRepo
Now it's time to see what the SuperRepo repository has to offer. From the main window, navigate to SYSTEM / Settings / Add-ons / Install from Repository / SuperRepo Repositories / Add-on Repository. The add-ons are divided into different categories. You can install these categories one by one. Among other Third Party Repositories, Genre Live TV and Category Video are interesting. Scroll a few windows back to the section Install from repository. Look for interesting add-ons and add them to Kodi by choosing to install.
17 Sports Streams
Many sports enthusiasts use Kodi to whip up illegal sports streams. That is not so easy, by the way, because the streams are often very unstable or even do not work at all. Moreover, working streams keep popping up under different names. You can of course give it a try, although that is of course illegal. Leave hopeful names such as NL Sports and Dutch Sport Streams to the left, because they no longer work properly. At the time of writing you can watch Dutch and foreign sports matches live via the SportsDevil add-on.

18 SportsDevil
SportsDevil is one of the few add-ons that offers stable sports streams. After installation, open this extension via VIDEOS / Add-ons. There are different categories, although Live Sports, Sports TV and Live TV all come down to the same thing. SportsDevil imports streams from illegal websites. Football matches from the Bundesliga, Serie A, Premier League and the Dutch Eredivisie are available to everyone. Click on a stream you want to see and wait for Kodi to fetch the live footage. In addition to football, you can also watch all kinds of other sports matches with SportsDevil.