A NAS serves as a central storage center within your home network. That means you can access stored data with other devices. Think, for example, of a computer, tablet, smartphone, media player and audio system. In addition, you also use a NAS to store new data, such as surveillance images from an IP camera. How do you tie this versatile network drive to other devices?
Each nas has its own operating system with which you can operate the device. For example, Synology uses the acclaimed DiskStation Manager (DSM). Since this Taiwanese brand is the market leader in the Netherlands in the relatively thinly occupied nas market, we are going to work with this (Dutch-language) operating system in this article. It is good to know that the functions discussed are usually also available on other NAS. For example, QNAP devices under the name QTS also have a very extensive operating system with many features, which is very similar in structure to DSM.
Update DSM?
In this article we use the latest version, namely DSM 6.2. Within the user environment of your Synology NAS, go to Control Panel / Update and Restore and make sure you are using the most recent version. If necessary, click To download and Update Now / Yes to install the update. After a short wait, the system will reboot.
01 Drive letter in Windows 10
The easiest method to access your NAS from Windows is to associate a drive letter with the device. You then have direct access to all data from Windows Explorer and you can also simply copy new files to the network drive. Open Windows Explorer and click . in the left column This PC. All current disk drives are listed here. You choose at the top Computer, after which you click Network connection. Add station which drive letter you want to attach to the nas. It is important that you enter in the text field behind folder enter the correct server address, namely \servername\foldername. For example, are the server and folder names DiskStation and Music, then in that case you type \DiskStation\Music. Through To leaf through you can often also select the desired folder. Confirm with Complete and enter the correct login details if necessary. Your NAS is now accessible within Windows Explorer via a drive letter. Want a desktop shortcut? Right click on the disk drive and choose Create Shortcut / Yes.

02 Cloud Station Server
Because of the high file capacity, a NAS is extremely suitable for backup purposes. There are all kinds of possibilities for this. Do you want to periodically save an exact copy of computer data on the NAS? Synology has excellent solutions available for this. First, install the Cloud Station Server application on the network drive. Within DSM, click Package Center and find the mentioned application in the application list. Confirm with Install / Yes. Through To open you will end up in the user environment of Cloud Station Server. You now indicate which shared folder(s) on the NAS you want to use as the destination location for the backup. Go to on the left Institutions and click on a shared folder where you want to save the backup(s). Confirm at the top with Switch and, if desired, decide how many versions you want to keep of the saved files. Handy in case you want to restore an older version of a file in the future, such as an edited photo. Make a choice and click OK / OK.

03 Set up backup
You are now going to install a program on the PC or laptop with which you want to set up a backup task. Surf to the Synology site with this computer and select the type number of your NAS. below Desktop Utilities you will see all available tools. Click behind Cloud Station Backup on the installation link. You can use the program under Windows, macOS and Linux (Fedora and Ubuntu). During the installation, select the Dutch language and go through the remaining steps. When you open Cloud Station Backup for the first time, choose Start now. Enter your QuickConnect ID (see box), username and password. For safety, it is wise to select the option Enable SSL data transfer encryption to activate. Through Next one the program checks the connection to your nas. The computer's local folder list appears on the screen. Check all file locations you want to back up. Then click behind Backup target on Selecting, then point to the target location on the NAS. Confirm successively with OK / Next / Done / OK. The backup is performed immediately.

QuickConnect ID
If you often log in to a Synology NAS from different devices, it is wise to use a so-called QuickConnect ID. This gives the network drive more or less its own domain name, so that you can easily access your files both inside and outside your home network. A big advantage is that you do not have to change advanced settings of your router. Within DSM, navigate to Control Panel / QuickConnect. You probably already created a Synology account with QuickConnect ID during the configuration of the NAS. Put a check in front if necessary Enable QuickConnect. Agree to the terms and conditions below and confirm with To apply. The web address with which you can reach your nas anytime and anywhere appears on the screen. This url always starts with //quickconnect.to/ followed by a name of your choice.

04 Set up synchronization
Through the computer program Cloud Station Backup, the backups take place in one direction, namely from the computer to the NAS. You can also choose synchronization as an alternative. This is a two-way street. The contents of a chosen folder on a NAS and one or more computers always remain synchronous. Whether you store files on your laptop or PC, the data automatically ends up on other synchronized devices. The condition is that the selected devices are connected to the (home) network. Importantly, the Cloud Station Server application discussed earlier is running on the NAS. Download the Cloud Station Drive program to your computer. After installation, fill in via Start now enter your QuickConnect ID, username and password. On the NAS and computer, point to a specific folder that you want to use for the synchronization task. To do this, click the pencil icon behind both devices. Last choose Complete / OK. In the future, you can drag files to the synchronization folder as you wish to exchange the data with different devices.

05 Mobile access
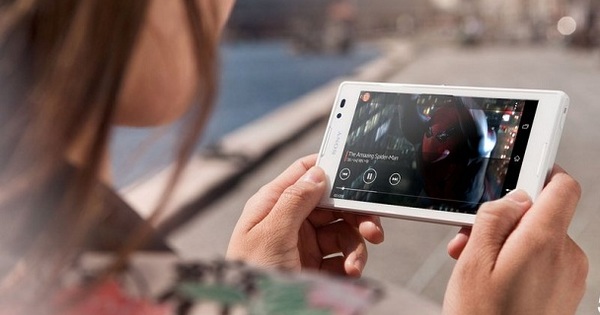
At the time of writing, Synology manages no fewer than sixteen apps for mobile devices. They all work under Android and iOS (iPhone and iPad). Some applications also work with a Windows Phone. In every app you use the QuickConnect ID in combination with your login details to connect to the NAS. This can be done within the home network, but also remotely via the internet. Do you simply want access to all data on your NAS? Then install the DS File app. After logging in, you will be presented with the full folder structure of the network drive. For example, you can view photos, watch videos and open documents. You can save favorite files locally, so that you can also open them without an internet connection. Alternatively, you can automatically sync a specific folder on your NAS to your smartphone or tablet. You use the DS Cloud app for this. An important difference with DS File is that DS Cloud stores the contents of the sync folder locally. So you have offline access to the data. After you have logged in, you indicate which folder(s) you want to synchronize with the mobile device. You choose the maximum file size and the desired file types at your own discretion. Please note that DS Cloud will only start sync tasks when connected to Wi-Fi. You can adjust that in the settings.

Backup mobile photos
DS File offers a handy function to automatically back up new photos and videos to your NAS. Tap the three horizontal lines at the top left and choose . in the menu Photo Backup. Through Enable Photo Backup / Next give you up Choose folder where you want to keep the photos and videos on the NAS. Tap on Back up new photos to save newer images directly in the future. Of Backup all photos you can also transfer previously taken photos to the NAS. To limit mobile data usage, further select the option Upload via WiFi only. hit with Ready finally the changes.
06 Activate media server
A NAS has ideal properties for storing media and then sharing the files with various playback devices within your home network. Think of a computer, smart TV, media player, music system or game console. After all, there is sufficient storage capacity available to store all kinds of films, series, music albums and photos. Due to the low energy consumption, you can leave a NAS switched on continuously, so that the media files are always accessible. To stream media files from a NAS to other devices, first activate a DLNA media server on the network drive. Thanks to the dlna protocol, different devices can share media with each other without the user having to change all kinds of advanced settings. Open it within DSM Package Center and click below media server on to install. Through To open select the option behind DMA menu language Dutch. Confirm with To apply. There is a chance that your audio system, smart TV or media player does not support a certain file format. Through the part DMA Compatibility therefore check the options Enable audio transcoding and Enable video transcoding at. click on To apply. Incidentally, the ability to transcode videos to another format is not available on every Synology NAS.

07 Add media
Now that a dlna media server is running on the nas, you can stream media files to suitable playback devices. Logically, you would first add media files to the network drive. In DSM, click File station and notice that the music, photo and video shared folders have been added to your nas. Open a folder and add via Upload / Upload – Skip and browse to the local media folder on the PC. Select the desired files and click To open. Incidentally, you can also copy music, photos and videos to the NAS in other ways. For example, in section 01 you already read how you can realize a network connection to your nas in Windows Explorer.

08 Streaming media
You can access the dlna media server on your nas with various devices. How this works exactly differs per device. For example, on a recent LG smart TV you use the Photo, Video and Music applications to play media files, while on a PlayStation 4 you open the Media Player application. On many other smart TVs, you open the source list with the remote control, where the media server is listed. Many media players and HTPCs rely on Kodi for organizing media collections. Of course you add shared folders of your NAS to this software. We describe how this works with videos stored on the network drive. From Kodi's main menu, go to Videos / Files / Add Videos / Browse / Windows Network (SMB) and choose the name of your nas. Then select the correct media folder. Through OK Can you think of a name for this media location? Confirm with OK and give back This folder contains what kind of videos the folder contains. When it comes to series or movies, Kodi picks images and descriptions from the web. click on OK to add the media files to Kodi permanently.

Chromecast Support
Do you want to stream media from your NAS to a Google Chromecast? That's nice, because various Synology apps offer support for this. For example, you can work with DS Audio, DS Video and DS Photo. Please note that you need to install corresponding applications on the Synology NAS, namely Audio Station, Video Station and Photo Station respectively.
09 Video surveillance
A NAS is also extremely suitable for surveillance purposes. Synology currently supports nearly 7,000 cameras from around 120 brands. Convenient, because you can combine products from different manufacturers. Do you also have a security camera that you can connect to the network? Check here if you can use this device. Open it in DSM Package Center and install the application Surveillance Station. If desired, you can reach the camera system via a custom alias or port. This allows you to launch Surveillance Station directly, without having to log in to DSM first. If desired, tick the boxes and choose Next / Apply. After the installation process, a message will appear that the ntp (network time protocol) service is enabled. Close the window with OK. click on To open to open Surveillance Station in a new browser tab. It is important to know that you can usually use two cameras in Surveillance Station. If you want to add more surveillance cameras, you need a paid license.
10 Add IP camera
As soon as you start up Surveillance Station for the first time, introduction messages will appear on the screen. Click these windows away. Before you add an IP camera to the video surveillance system, first connect the device to the (wireless) home network and use the surveillance app of the camera brand in question. After that, within Surveillance Station, go to IP Camera / Add / Add Camera and select the option Quick installation. Via Next you click on the icon with the magnifying glass. Is your camera in the list? Click on it and choose OK. If the IP camera does not pop up by itself, enter the IP address and port number. In addition, enter the correct login details. You can adjust the video and audio format at your own discretion. Check the camera image by clicking Test connection and finish with Finish. Through Edit / Edit / Recording Settings you determine, among other things, how many days you want to keep recordings. Open the tab Schedule and indicate in the timetable on which days and times you want to activate motion detection. If the camera detects movement, Surveillance Station saves the recording on your nas. You can also record continuously. Do you like to keep an eye on the road? For Android and iOS, you need to install the DS Cam app.